|
by Cara Jordan This is a follow up to one of the items we discussed in our October 7, 2013 blog, Mold Before & After.  The suitcase full of John E. holland, Jr.'s uniforms. A plastic suitcase filled with uniforms belonging to WWII Marine Veteran John E. Holland, Jr. arrived at Museum Textile Services in spring, 2013. The owners were distraught that the suitcase had inadvertantly been stored in a damp basement, leading to the dramatic condition of the items inside.  Baseball jersey after conservation. Holland's three-piece baseball uniform was vacuumed, fumigated in a chlorine dioxide chamber, and wetcleaned to clean it and kill the mold spores. The jersey and pants are made of grayish wool with red piping along the sleeves, neck, and front closure. All that remains of the team name is a single “I” in the center of the closure, along with a coordinating red button. The owners believed that Holland had played minor league baseball for a New York affiliated team. A quick search on www.baseball-reference.com for New York affiliate teams with the letter “I” in the name was inconclusive.  Close-up of the remaining letter "I" and some red thread. I noticed that quite a few fragments of red fabric and thread remained on the front of the jersey where the lettering had once been. So I put the jersey on a light table to see if any of the machined stitch holes that once attached the letters remained, but we were thwarted. Next I printed some digital photographs and highlighted the red remnants on the image. When I "connected the dots,” I was able to make out an “E” and “R.” The other letters were less forth-coming and the team name remained a mystery. I put the images aside for a few days later we took another go at it. Soon I was able to decipher a possible “A” and “N,” giving me "_ A? R I N? E _." Then it dawned on me: this wasn’t a minor league jersey at all! It was a MARINES baseball jersey.  Image courtesy of www.usmilitariaforum.com. According to Wikipedia, US Armed Forces baseball dates back as far as the Civil War. More recently, military baseball was used as a recruiting tool to attract personnel and improve morale among the troups. Military baseball was at it’s apex during John Holland Jr.’s time, with big leaguers like Ted Williams and Joe DiMaggio playing on service teams. I suspect that Holland played ball for the Marines team during his time with them in WWII and then reused the jersey after his discharge.The mystery of the moldy jersey had been solved!  Photo captioned, "Boots Poffenburger, US Marines." Image courtesy of www.usmilitariaforum.com. Although mold isn't a conservator's favorite thing to deal with, this project has been rewarding on many levels.
1 Comment
by Josephine Johnson Some images in the art world are made and forgotten, while others are repeated over and over again in many different mediums. A popular image of Fame Decorating Shakespeare's Tomb recently found its way into Museum Textile Services' studio in the form of embroidered and painted silk.  "Fame Decorating Shakespeare's Tomb" currently being conserved at MTS. The embroidery depicts Fame as a woman decorating the tomb of the great William Shakespeare. The image was originally created by English painter Angelica Kauffmann in 1772. Kauffmann ranks among the first successful female European artists. The painting is a small metal roundel that may have been part of a large decorative scheme in a room. Her decorative images can be found all over furniture, porcelain, ceilings, walls, and as we've seen, embroideries.  "Fame Decorating Shakespeare's Tomb," painting by Angelica Kauffmann in 1772. Kaufman's painting was made into an etching a decade later by the English printmaker Francesco Bartolozzi. Converting a painting into an etching was a common way to reproduce an image before photography was invented. The etching of the painting is probably what inspired the embroideries because an etching can circulate to a much bigger audience. Notice how the tomb in the embroidery matches the shape of the tomb in the etching, not the painting!  Etching of "Shakespeare's Tomb" created by Francesco Bartolozzi in 1782. The embroideries follow the tradition in the eighteenth and early nineteenth centuries of needlepoint created by school girls, who would have had much easier access to the etching than to Kaufman's painting. With inspiration coming from the black and white etching, the embroiderer had more freedom for creativity when choosing colors. In the slide show above you can see several other embroideries of Fame at Shakespeare's tomb. We love to see the work of a female painter celebrated over and over again throughout history!
By Camille Myers Breeze The response to our last blog, Battling Mold Outbreaks, was so good that we decided to show you more dramatic images of mold before and after conservation.  If you recall, the collection of John E. Holland Jr's WWII-era Military and baseball uniforms was stored in a plastic suitcase and had been exposed to moisture for a prolongued period of time. Consequently, a wide variety of mold species of different colors and textures had fluorished within the confined space.  The cotton items fared worse than the wool. The acidic conditions caused more rips and general deterioration in the naturally basic cotton. Stains, like those remaining on this hat, remained even after fumigation, vcuuming, and wetcleaning. 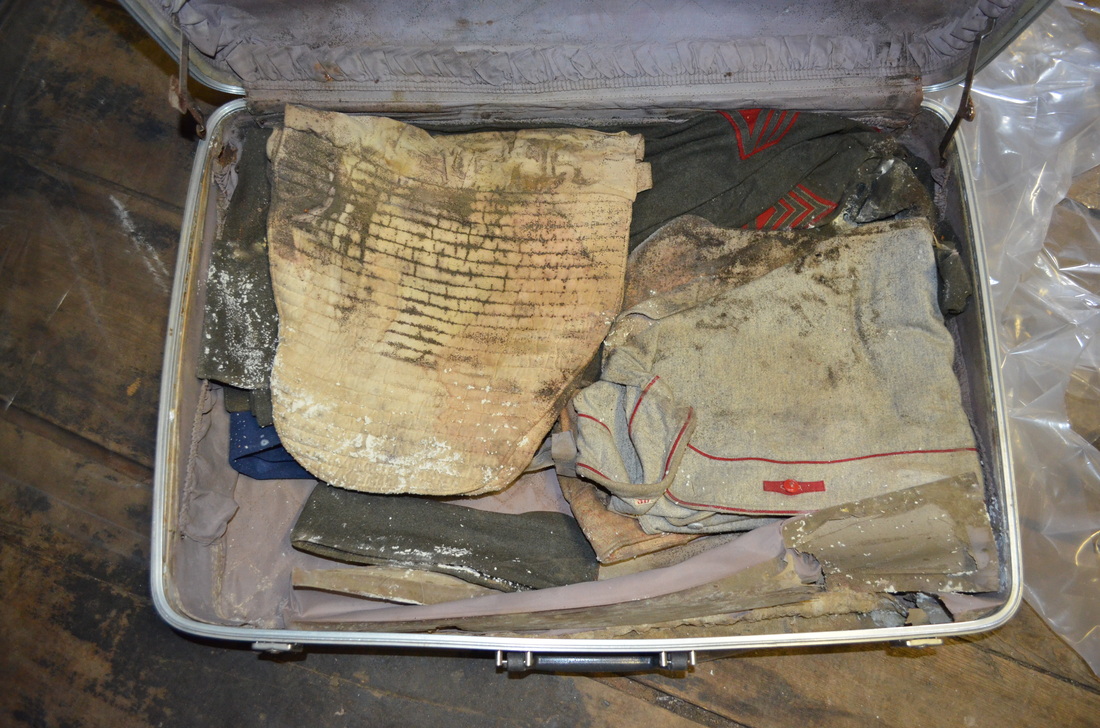 The baseball uniformhad both wool flannel and cotton catcher's pads. After fumigation and vacuuming, the wool uniform was conservation drycleaned, which greatly improved its appearance. We are now challenged with trying to decifer what team name was once stitched to the front of the jersey (it was not uncommon for the minor leagues to recycle older uniforms.) Only the "I" was left on the button placket, which is clearly visible in the above photo.  The catcher's pads were fumigated and vacuumed prior to wetcleaning. When dry, the pads were sandwiched in off-white nylon net to allow them to be safely handled without losing stuffing out of the many small holes caused by acidic degradation.  Arguably the most important single piece in the collection was Staff Sargeant Holland's dress uniform jacket in which he is pictured in his WWII photograph. Parts of the jacket, such as the badges on his left sleeve, were in pristine condition apart from the mold. Other areas, including the buttons and collar studs, had suffered moisture damage as well.  After fumigation, vacuuming, and conservation drycleaning, the jacket once again reflects the bravery and dignity of a WWII US Marine. Some of the collar studs and other bars and insignia on the uniforms had to be removed prior to drycleaning, and are now in archival bags.  The twelve items once stored in the plastic suitcase are now rehoused in four archival storage boxes. The family of Staff Sergeant Holland can now expect these intimate reminders of their recently-deceased WWII Marine to live on for generations to come.
By Josephine Johnson It's that time of year again when we start seeing a lot of moldy textiles around Museum Textiles Services. Mold spores are everywhere, all of the time, but it takes specific conditions for mold to bloom and become a problem. In 90% relative humidity and 90°F, it only takes three days for mold spores to flourish and bloom. As the humidity and temperature decrease, the time it takes for mold to bloom increases, so at 80% relative humidity and 80°F, it takes three weeks. At 70% relative humidity and 70°F, it may take up to three months for a mold problem to become apparent.  Military jacket with severe mold outbreak. We get the most calls from clients with mold problems in September, because 70%/70°F conditions may persist for three months and still feel quite comfortable. Mold also favors areas with low air circulation, so textiles in attics, basements, and backs of closets are at high risk for bloom. Needless to say, mold outbreaks are also very common following disaster events, such as hurricanes, floods, and fires.  A plastic suitcase containing WWII uniforms with a severe mold problem. 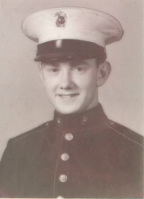 John Edward Holland, Jr. John Edward Holland, Jr. Most recently at Museum Textile Services, the culprit was a plastic suitcase that was discovered in a wet basement. The suitcase contained the World War II-era military and baseball uniforms of John Edward Holland, Jr., whose daughter recently inherited the suitcase. The collection consists of three hats, three jackets, two pairs of pants, and a baseball uniform. All of the objects were covered with a thick layer of multi-colored, furry mold. The patches and medals on Holland's uniforms tell us that he was a Staff Sergeant in the 3rd Marine Amphibious Battalion.  Intern Jen Nason vacuuming a moldy uniform jacket. The first step to battling the mold was to vacuum the textiles. It was very important to protect ourselves from inhaling mold spores, so we suited up with gloves, aprons, and masks, and worked outside. The next step was to kill the mold spores to minimize the chance of future outbreaks and to remove the human health hazard. To do this, we created a sealed fumigation chamber and exposed the items overnight to chlorine dioxide vapor. This treatment kills the mold spores and has also been shown to discourage future mold growth. When circumstances prevent vacuuming items first, we begin with the fumigation process.  Creating a fumigation chamber. Mold can be destructive: eating holes in fabric, weakening fibers, and leaving behind permanent stains. The wet and pestilent conditions in which this uniform collection was stored were so severe that the cotton threads holding the seams of one of the jackets together disintegrated, leaving the panels of the wool jacket largely intact. Cotton textiles in general are less likely than wool to survive conditions in which mold flourishes. This is because dirty, wet, and decaying conditions are usually acidic, and naturally acidic protein fibers such as wool will tolerate acid better than naturally basic plant fibers like cotton.  Military jacket after treatment. If you believe your historical or artistic collections have a mold problem, contact a conservator immediately. Do not use Lysol or other disinfecting chemicals on the items, or place old and fragile textiles in the sun to kill the mold. These actions may cause more harm than good. A conservator will walk you through the steps to safely dry and pack your items. You may be instructed how to carefully vacuum the textiles and surrounding areas to remove mold spores only if you are certain you can do so without damaging anything. If your items are already dry, you should quarantine them in zip-top or garbage bags before bringing them to a conservator.
For moldy modern clothing and textiles that are in good condition, you can take them to a dry cleaners for their professional opinion. By Camille Myers Breeze One of the most challenging flags that we conserved for the General George Patton Museum of Leadership is Patton's Western Task Force flag. The hoist binding is covered with signatures of the General and his men, whose victorious attack against Nazi forces in North Africa Allies concluded on November 18th, 1942. (Read Captured in Casablanca.)  From the front, the flag looks like all the others we have conserved. If you look at the back, however, you can also see all of the signatures on that side of the hoist. Here's how we accomplished the challenging task of making sure all of the men's names can be studied.
First, the flag was positioned on the panel and the location of the cut out was determined. A solid line was drawn on the aluminum in Sharpie marker. Holes were then drilled at the corners to allow the jig saw to pass through. Once the section was cut out, we the irregular and sharp edge were sanded with fine sand paper on a block.  The cut out was sealed with aluminum tape, which provided a solid wall inside the cut out. Thin archival padding was then double-stick taped to the inside wall. A finished edge to the cutout essential, so we ironed 3-mil BEVA film to strips of mounting fabric to make them heat sensitive. The strips were then ironed on to the panel.
Like all flag mounts, this one was covered with 1/4-inch archival polyfelt. The padding was then voided to match the cut out. The panel was covered as usual with khaki cotton fabric, which also needed to be voided. When this was complete, the flag was positioned on the mount and pinned in place. The flag was hand stitched to the panel along the hoist binding first to insure perfect alignment. The cut out was eventually covered with Melinex, attached with double-stick tape, to prevent the flag from being touched.
The signatures on the underside of the flag hoist are now visible, however the security guards in the Patton Museum will probably get upset if everyone squats on the floor and tries to crawl behind the brackets that hold each flag at a 45-degree angle. If you are a VIP scholar, however, all of the signatures are now accessible for study.
By Camille Myers Breeze As the deadline approaches for us to conclude the replication of the Henry Adams bed hangings, we are one step closer to the key component: receiving the digitally printed fabric.  Original bed hangings in situ at Adams National Historical Park. Trustworth Studios, in Plymouth, MA, is the home and studio of artist David Berman. He produces exquisite wallpaper, needleworks, and fabrics from historic patterns and photographs. He is perhaps best known for his line of C.F. Voysey designs which he has brought back to life and made available to today's commercial market.  David Berman of Trustworth Studios in his beautifully wallpapered stairwell. Joining me for the exciting task of reviewing fabric samples was Kelly Cobble, Curator of the Adams National Historical Park. Kelly is the supervisor of this conservation project and has the daunting task of helping to decide how close to the fabric's original appearance this new fabric should be.  One of the two giant HP printers at Trustworth Studios. The challenge in reproducing this fabric digitally comes from the fact that it is a silk rep (having a slight ribbed texture) with regularly spaced medallions of white silk floats and a moire, or watered pattern. The fabric is discolored from soot and smoke and damaged from age. The original cochinille pink color is preserved inside seams, however the rest of the bed hangings are a more masculine burgundy tone.  Samples of printed fabric, along with a possible solid lining fabric, are examined in the studio next to the original fabric. We settled on a favorite sample, with a 7.5% layer of "dirt," or slight darkening applied. We then took all of the samples to the Adams National Historical Park to examine them in situ and see if our favorite was still the best choice.  The samples look quite different in the room in which they are to be used. When we compared the printed samples and the original fabric on the bed where it is to be displayed, the results were completely different. The lighting in the third-floor room is UV filtered and the ceiling is fairly low. We concluded that the sample with no "dirt" applied was perfect. In other words, David Berman's original final product was spot on!  Kelly Cobble, Curator of Adams National Historical PArk, and David Berman of Trustworth Studios. We are very anxious to receive the 30 yards of digitally printed fabric from Trustworth Studios early in August and to finally begin the process of hand sewing the replica bed hangings!
By Camille Myers Breeze We are proud to announce that Issue 2 of the MTS e-Magazine is now available! Featuring project updates, useful information, and news from our studio, our annual publication will help spread the word about the great world of textile conservation, including the museums that work so hard to preserve our cultural heritage.  Click to open the e-Magazine If you'd like to learn more about what we're doing, please visit us at our website and check out our blog. Feel free to spread the word to your friends. They can also subscribe by filling out the Mail Chimp subscription form. And lastly, we'd love to hear from you about the magazine or with any textile conservation questions. You can post a message on ourfacebook page or use the contact form right on our website.  Enjoy, and don't be strangers!
Camille, Cara & the crew by Aimee-Michele Pratt Among the most popular items that we conserve at Museum Textile Services are needlework samplers. As a new member of staff, I decided to research what a sampler is and where they are made.  Director Camille Myers Breeze with a 1773 sampler conserved at MTS that has since been donated to the Wadsworth Athaneaum in Hartford, CT. The word sampler is derived from the French word essamplaire, which means anything that is to be copied or imitated. The earliest samplers illustrated this idea as they were pieces of cloth on which embroiderers experimented with stitch effects or recorded patterns for future reference. Effectively, samplers took the place of pattern books, which were not widely available.  This 1756 sampler by Elizabeth Mason is executed in silk and metal-wrapped-silk threads on linen plain weave. It depicts the moral scene of Adam and Eve in the Garden of Eden. In the eighteenth century (in America and much of Europe) samplers took on a different utilitarian function. During this time, girls and young women created samplers as a part of their basic education. They were vehicles through which schoolgirls could practice their embroidery techniques, and learn their letters and numbers. These are the works that many picture when thinking of an embroidered sampler. They commonly include alphanumeric characters, simple sayings, or biblical quotations. In more ambitious pieces, girls included simple pictorial scenes.  Conservator Cara Jordan using the Preservation pencil to remove the sampler from the board to which it was taped. Some of the samplers in the slideshow below are familiar, and others defy the common concept of a sampler. Included are examples of ancient reference samplers from Peru and Egypt, elaborate darning samplers, ornate whitework, and a fascinating piece in the textile collection of the Victoria and Albert museum on which a woman has embroidered her entire life story. These examples have expanded our understanding of what a sampler can be, and illustrate the sampler’s evolving form and purpose. I hope you enjoy this exploration of the wonderful world of samplers.
By Jen Nason and Camille Myers Breeze One of the procedures regularly practiced at Museum Textile Services is the science of wetcleaning. We use the term “science” because it truly is just that.  Knit bedspread before sodium borohydride treatment. Many textile conservation labs like Museum Textile Services use a deionized water system. Although water alone is a strong cleaning agent, we may also employ a mild surfactant (similar to soap) to encourage additional soil removal. Occasionally we will also use bleach to improve the appearance of discolored textiles.  Knit bedspread after sodium borohydride treatment. The favorite method of bleaching at MTS employs the reductive bleaching agent sodium borohydride (NaBH4). Other methods, such as chlorine bleaching, are oxidative processes. Sodium borohydride can only be used on cellulosic fibers, such as cotton and linen, because it is very alkaline and can damage naturally acidic fibers like wool and silk.  Christening dress before sodium borodydride treatment. As cellulose ages, hydroxyl groups (-OH) are converted to carbonyl groups (=O), which contribute to a dingy brown or yellow color. Reduction adds electrons to the cellulose, which stabilizes its molecular weight and returns carbonyl groups back to colorless hydroxyl groups. Stains are not generally removed with the addition of sodium borohydride but the overall results are better than wetcleaning with surfactant alone. Remarkably, sodium borohydride is color safe when used at its proper strength, and MTS has safely bleached many embroideries, patchwork quilts, and other colored cellulose textiles  Christening dress after sodium borohydride treatment. Whether or not you appreciate the science behind conservation, the results of our recent sodium borohydride treatments are quite impressive. The textiles seen here are noticeably brighter without looking over-cleaned. Most importantly, their preservation levels have been improved with a minimum of risk.
by Jen Nason and Camille Myers Breeze Fragile and historic textiles pose many challenges to textile conservators, especially when their aim is to reduce wrinkles or to re-hydrate dry and brittle fibers to allow for safer handling. However, all of this can be accomplished using Gore-Tex (Polytetrafluoro-ethylene, or PTFE).  Textile before Gore-Tex Humidification. The pores in Gore-tex membrane are large enough for water vapor to pass through but too small for water droplets, which gives it the “breathability” desired in clothing and shoes. This low-risk, high-tech humidification system introduces cool water vapor into thirsty textile fibers without the use of heat or pressure, and requires no electricity.  Textile is placed on a dry blotter on plastic. Our newest MTS Handout is on the Gore-Tex Humidification System. It requires few supplies but you must have a clean, flat surface to work on.To make it easier to learn this technique, we have made a short video to demonstrate using the Gore-Tex system.  Textile is placed in the chamber, which is sealed with weights. You can adjust the variables—such as time, moisture, whether the Gore-tex is membrane-up or down, and placement of blotters—to suit each situation. Never leave a textile in a Gore-Tex chamber unattended, as over-wetting can occur, causing dye bleed or fiber weakening.  After humidification, the textile is blocked with pins to dry. Gore-Tex humidification is ideal for historic textiles that can not stand the pressure and high-temperature of ironing or steaming. Painted textiles are particularly suited to Gore-Tex humidification, though the paint layer has been known to become tacky. Because the textile is not pressed or rubbed, the paint can be allowed to dry safely as the textile dries.  Textile after Gore-Tex humidification. Gore-Tex humidification can provide excellent visual results, or sometimes just a modest improvement. In either case, a textile can benefit greatly from being rehydrated and realigned, which leaves it in a better state of preservation.
|


